You have created your (likely first) city in Tribal Hero. Congratulations! First looking at your newly-founded, and rather empty-looking, city, you will find yourself presented with a number of options. The goal of this page is to walk you through, step by step, the creation of an efficient city in order to thrive in this game.
Before getting started, please realize that this is meant to show you a good way to build a city from the ground up. There are not necessarily "right" or "wrong" ways to build a city, though there are definitely ways in which to build that are smarter than others, especially in the long run.
Orienting Yourself[]
The Game Window[]

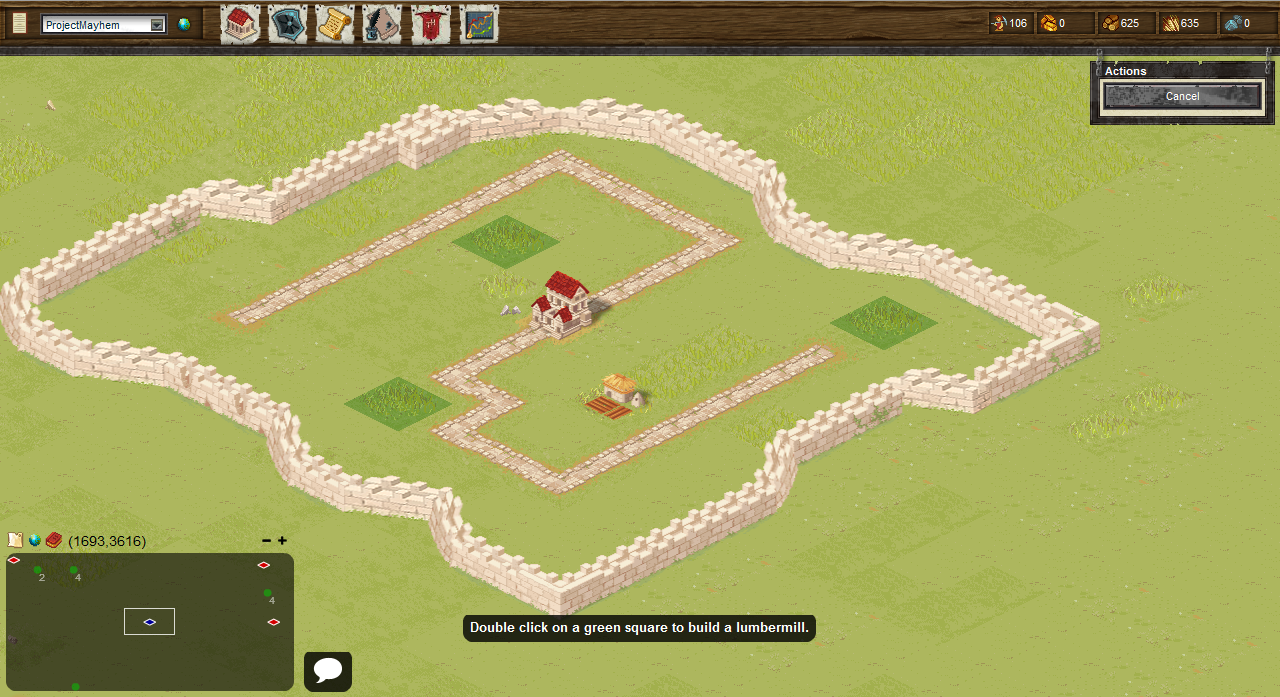
When you first found a city, especially your first, this is what you will see. You should be aware of what a number of your options are.
Let us first examine everything that you see when your city is first founded, especially so you can be aware of things that this tutorial will reference later on. This will also give you the ability to explore your options and make choices on your own, deviating from these examples as you see fit down the line.
In the image to the right, there are a number of pieces of data and menus of which you need to be aware:
- In the upper right-hand portion of the window is likely the portion of the screen at which you will be looking the most. This section lists the resources available to your currently selected city (since you are likely just starting the game, you will only have your one city at this point). These five numbers are, from left to right (For now, don't concern yourself too much with what these things actually are. We'll expand on this later.):
- the number of available laborers in your city,
- the amount of gold your city has,
- the amount of lumber your city has,
- the amount of crops your city has,
- the amount of iron your city has.
- This button is your source for account administration as well as links to all of the game's documentation. The wiki is where you are currently reading this. The help page lists the specifics for the cost of buildings and their upgrades, costs and specifications for each unit type available in the game, and descriptions of various technologies you can research as well as their associated costs. Finally, in the forums you can have more detailed discussions regarding the game that aren't particularly suited to the in-game chat.
- This drop-down menu lists each city that you own. At the beginning of the game when you only have one city this will be of little use, but as your create more cities farther down the line, this will let you immediately select and zoom to each city you own. After selecting a city from the drop-down box, you will immediately see all resources available in that city. By clicking on the globe icon next to the box, you can zoom the game window to center on that city.
- These are the buttons that will allow you to examine more detail regarding each city and your empire overall. More detail will be provided regarding the use of these menus later. They are, from left to right:
- the city details button
- the unit movement button (essentially this is your army management screen, this allows you to dispatch troops on offensive and defensive missions, view troops that are currently deployed and their status, and view troops currently awaiting your orders in their home city. For now, that's all you need to know, but much more on this later)
- the battle reports button, the messages button
- the tribe button
- the world rankings button
- On the lower left of the screen, this is your mini-map. Viewed in this image, the blue diamond is your city (or cities). Cities owned by other players will show up in a variety of other colors, but never blue. On the mini-map you can also view green dots that represent forests. The number next to each green dot is the level of that forest, another concept on which we will expand later. Finally, you may also see some red dots on your map. These are armies, either those belonging to you or other players, that are on the move.
- These buttons are, from left to right, the world map (a larger version of the mini-map that can be read in the same fashion as described above), the search button (this allows you to manually type in the name of specific players, cities, or even map coordinates in order to zoom there or detail that player), and the all-important feedback button. Note that the feedback button sends a message directly to one of the developers of the game, guilanob in the game world, if you ever feel that is needed.
- This button opens up the global chat. When you first logged into the game, this window may have already been open. If you click on the X in the upper right corner of the global chat window, it is minimized to this button. This is an excellent resource for new players who are unable to find help in any of the documentation. Veteran players are more than happy to help new players in this game, but please do try to find the answer on your own before asking something that is written in the documentation.
See also Game Interface
The beginnings of your empire[]
Building a Farm[]

The menu for your town center, the only building with which you start, can be accessed by clicking on that building.
Now that you are aware of what each item in the periphary of the game window does, its time to move on to the meat of the game itself. At the very beginning of your city, you will only have one building. This is your Town Center, the core item from which you will build your city. In the beginning, this is the only structure capable of making other structures, but this will change later on.
First, access the menu for the town center by clicking on the building. You will see 5 options, 4 of which are available to you at the moment. The upper three options are, from the top down, upgrading your town center (the option that is currently unavailable to you for reasons that will be explained shortly), constructing a Farm, and constructing a Lumbermill. The lower two options involve the placement of roads around your city, a necessity that we will explore shortly.

By hovering your mouse cursor over an option, you can see it's description and cost.
With the menu for your Town Center open, you can hover your mouse cursor over each option to get a detailed description of what that upgrade/building does, what benefit it provides to you, the combat characteristics if applicable (don't worry about this for now), and the cost of that option. In the picture to the right, you will see what comes up when you look at the details for the Farm. At the very bottom, the costs for building that structure are listed in the same order as your available resources are shown at the upper right.
At this point you may wish to hover over the option to upgrade the Town Center in order to see why you are unable to do so. You will see that in order to upgrade, you must first build a Farm and a Lumbermill even though you have enough resources otherwise. If you ever do not have enough resources to complete a construction or an upgrade, the cost of the resource(s) of which you do not have enough will be shown in red.


Clicking on the option to build a Farm or a Lumbermill will highlight 4 darker green squares in your city where they can be built.
You know now that you need to build a Farm and a Lumbermill. First, click on the button to build a Farm. This will highlight four special squares in your city where these structures can be built there.
Note that these two structures, the farm and the lumbermill, can only be built on these four special squares and nowhere else within your city, and nothing else can be built on those squares. These squares are placed randomly when your city is first created and you are not ever able to move them.


Double-clicking on one of the available squares will begin construction of your farm.
Double-click on one of the available squares to begin building your farm. Once you have begun building in a square, the menu for your Town Center will appear again. This shows at the bottom that the Town Center is building a Farm, as well as a counter showing how long this construction will take to complete.
Notice that after you double-clicked to begin construction of your farm, the resources necessary to build the structure were entirely subtracted from your stores. Building costs for all items in this game must be paid entirely up front; they are not slowly consumed as a structure is constructed. It is possible to cancel the construction of buildings as well. One should be very careful when doing this, however. You have 60 seconds to cancel the construction of something in order to recieve a full refund of its cost. After that time, you will only get back half of the resources that you paid to build it.
The construction of all buildings takes time in addition to resources as you will soon learn. Especially at the very beginning of your city, your primary focus should be one thing: maximizing resource income. This topic will be expanded upon later; for now the most important things to remember are that you should be most concerned with getting as many resources as possible, as quickly as possible.
This is accomplished by upgrading farms and lumbermills whenever possible, as well as your Town Center. It is important to upgrade one's Town Center regularly for a number of reasons, but at this point in the game only one reason is of significant concern to you. Crops, lumber, and iron all have a maximum amount that can be stored in your city, and this is affected most significantly by the level of your Town Center. Whenever your city has hit the maximum value for a given resource, you effectively stop producing/collecting it, wasting potential income.
Building Roads[]
While your farm is under construction, this would be a good time to place some roads in your city. While simple in concept, the placement of roads can be complex in practice. Most structures in this game require a road to be next to them and as such the proper placement of roads is vital to effieciently utilizing as much space in your city as possible. Your biggest obstacle in placing your roads are the four special squares mentioned earlier, on which only farms and lumbermills can be built.


By clicking on the "Build Road" option in the Town Center menu, you will be shown where you can build roads within your city.
In the menu for your Town Center, click on the "Build Roads" button. You will see a screen similar to the one shown to the right. All roads must be attached to each other or your Town Center.
As such, at first, you can only build a road in the four squares that immediately touch your Town Center, as shown by the four squares that became highlighted when you chose the "Build Roads" option.

Double-clicking on a highlighted square will build a road in that square and show what squares are available for new roads.
Double-clicking on one of the available squares builds a road in that square. Note that building (or destroying) roads is instantaneous and does not consume any resources.


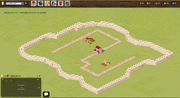
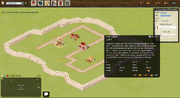
A completed road system and farm
You may complete as much or as little of your road system as you would like to right now, though it is recommended that your complete your roads sooner rather than later. It is much easier to move roads around right now than it is to move buildings around later.
Generally, a shape similar to an upper-case 'S' is among the most efficient road setups one can have in a city. Oftentimes, the placement of the special squares for farms and lumbermills prohibits executing this perfectly. When this is the case, you simply have to make do with what you have and do your best to figure out the optimal layout for your roads. As you can see in this image to the right, the 'S' shape was not possible to make perfectly, and and workaround had to be improvised.
On to your Lumbermill![]

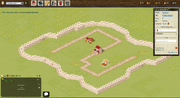
Lumbermill placement appears in a similar fashion as farm placement.
Now comes time to place your Lumbermill. This is done in a similar fashion as building your farm. Click on your Town Center. This time, your only availale building option will be that for a Lumbermill. Clicking on this button will again show you squares on which you can build. As one of the four special squares is occupied by your farm, only three are now available.

Beginning construction of a Lumbermill is similar to that of a farm.
Again, double-clicking on one of these squares will begin construction of your Lumbermill.
Making your Farm work[]
Now, simply building a Farm does not instantly mean that you will get resources from it. This will be the first time that you will utilize the resources of your laborers. This is done by assigning laborers to work in specific buildings. Laborer assignment is limited only by the maximum capacity of a building or by the number of them that you have available in your labor pool at the time.


Once your farm (and later, other buildings) has been constructed, its menu can be reached by clicking on the building.
Begin by clicking on your Farm in the same manner as you have done with your Town Center up to this point. You will note that you are already able to upgrade your farm. However, above the upgrade button on your farm menu, there is something that you did not see in your Town Center menu. That is your current labor allotment to the building. Right now for your level 1 farm, you will see "Laborers 0/20", meaning that 0 laborers are currently assigned to be working in your farm, and the farm can currently fit a maximum of 20 laborers. Let's fix that.


The labor assignment menu for your level 1 farm.
In your Farm menu, there is another option that was not available in that of your Town Center. This option says "Assign Laborers". Click on this button.
There are a few things of which you should take note in this menu. Of the most importance is the slider at the center of the window. This is what actually allows you to place laborers into the structure. Right now you can also see, again, that 0 laborers out of a maximum of 20 are assigned. Next to that, you see that despite having no laborers in your farm, your city is already producing 45 crop per hour! This is because your Town Center always produces a small amount of both crops and lumber for you. Finally, you can see that you are only able to add 10 laborers at a time to the structure. The maximum number of laborers that can be assigned to a building at one time increases as the total maximum number of laborers increases, and is always approximately half of the maximum value.


Adding laborers in the assignment menu
At this time, move the slider as far to the right as you can. It will stop at the maximum that can be added at once, 10 laborers. You can see that two other things on the menu changed as well. First, it shows that your crop income will become 55 crops per hour, up from the 45 you were getting. Also, the timer at the bottom shows that it will take 30 minutes to assign these laborers. Click the "Ok" button.


Laborer assignment is shown in building menus in a similar fashion to building construction
Now that you have begun the assigment, you will be returned to the Farm menu. Here you can see at the bottom of the menu that the labor assignment is progressing along with a countdown timer, similar to what you have already seen in the menu for your Town Center when you have began construction of your Farm and Lumbermill. Please note that the laborers are added in one bunch once the countdown is finished, not one by one, so your crop production will not increase until the entire countdown is over.
City Information[]
Resource Details[]
At this point while your Lumbermill is building and your Farm has labors being assigned, there isn't much you can do to further your city's growth. Let's take this chance to explore in more detail some of the information that is available to you for each city that you own and for your empire over all (bearing in mind that at the beginning, you will only have one city).


You can hover your mouse cursor over the resource listing at the top right to get more details.
Begin by hovering your mouse cursor over the resources listing at the top right of your screen. You will see a tooltip pop up that shows you six things. These are:
- Your city's current gold stores and it's hourly gold income. As stated before, you won't have any gold to begin with that that's fine, it won't cause you any problems. Early on, gold is most easily gotten by selling resources, a topic that you will learn about later. Selling resources provides one-time income each time that you sell them. After some time, there are higher levels of structures as well as technology you can research which will provide a constant gold income stream as well, in a manner similar to the that you have lumber and crops accumulate over time.
- Below that you can see your city's current crop level next to it's maximum crop level. You can also see your crop income. Note that in the illustration to the right, the crop income is still listed as 45 per hour. This is because laborers have no yet completed their assigning to the Farm, and as such all of your crops are currently being generated by the Town Center.
- The last item in the left column is your laborers. Right now in the illustration to the right, you can see that there are 99 idle laborers and 0 that are working. Idle laborers are your "available" laborers that can be used for tasks as you see fit. Laborers as considered to be working once they have completed assignment to a structure.
- At the top of the right column is your available lumber. All of the information here is exactly the same as it is for your crops listing.
- Below this is your available iron. Again, like gold, this is something that you will not need for some time and as such you do not have any nor are you generating any.
- Finally, the last item shown is your upkeep. Upkeep is what it costs to maintain a standing army. Every individual unit that you will eventually train costs crops to keep alive; they no longer cost any upkeep as soon as they are killed in combat, however. At the beginning, all troops available to you will cost you 1 crop per troop per hour in upkeep. Later, however, this number is higher for more advanced (and thus, powerful) troops.
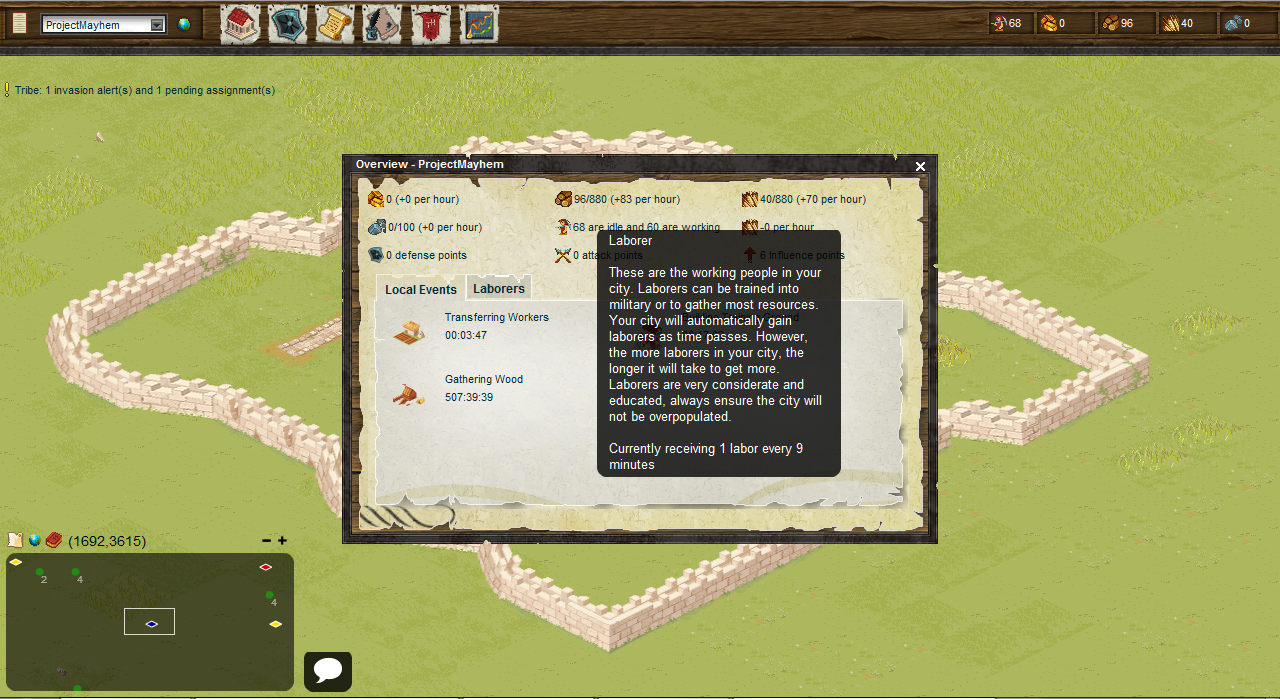
City Overview Screen[]


A view of the city information screen.
Now that you have been familiarized with the resources tooltip, click somewhere in the same area of your resources listing. This brings up the city information screen; this same screen can be accessed by clicking on the city details button. Much of this information is the same as that shown in the tooltip and has already been explained above. However, there are some important things here that greatly help you to manage your city and get a good overview of everything going on there. Below the 6 resources about which you already know, you will see there are 3 types of points that are kept track of in your city:
- Defense points- these are earned either when you are attacked by another player or send a defensive mission to defend a city that is not the one that your troops are from. These can only be earned and never lost, so this number will only ever increase for each city.
- Attack points- this is a concept similar to defense points. Whenever you attack the city of another player, you will earn attack points. The number that you can earn each time you attack someone else can be anywhere from 3 points up into the hundreds (thousands are possible, but very rare and difficult) of points per attack later in the game when you have a large military. How these are calculated is a moderately advanced topic and definitely not something with which you should concern yourself this early in building your city.
- Influence Points (IP)- this is a simple concept, but an important one. Influence points for each city are simply the sum total of the level of each building you own. So, for example, at the moment you have a level 1 Town Center and a level 1 Farm, which means that you have a total of 2 IP. If you were to have a level 3 Town Center and a level 3 Farm, you would have a total of 6 IP. While attack points and defense points are simply metrics that you can use to compare yourself to other players, Influence Points are slightly different as they do affect your actions. As you want to build new cities, you must have a minimum number of Influence Points to do so. For example, your second city requires you to have a minimum of 100 IP and your third city requires you to have a total of 240 IP. You should also know that these minimums are calculated as the total of the Influence Points in all of your cities, meaning that when you have 100 IP in your first city, you can build a second. However, when building a third city, you are required to have a minimum of 240 IP in total between your two existing cities; you do not have to have all 240 IP in one city. Influence points can be lost, unlike attack and defense points, if you are attacked and buildings that you own are reduced in level or destroyed!
Below the resource details and points information you will see a window showing all of the activites currently occuring in your city. Right now you'll see that two things are occuring: your lumbermill is under construction and that laborers are being assigned. You can check each individually to see how much time remains until completion, but being able to see all of this information in one place saves you time and helps you to plan accordingly.
There is a separate tab next to this window, the Laborers tab. This shows you each building that you have that can be assigned laborers along with the current and maximum number that are or can be assigned there.
Some Notes on Laborers[]
First and foremost, remember this: laborers are the most valuable resource that you have! All other resources can be bought, sold, earned, accumulated, traded, looted, and moved other places. You can not buy (nor sell) laborors, they cannot be killed by players attacking you, and you can not move them between cities.

Laborers are slowly accumulated over time. As your city gains more laborers, the rate at which you accumulate them slows down. You can view the rate at which you are currently getting more laborers from your city overview screen. Simple hover your mouse over the portion of the information you can see regarding your current labor pool, and a tooltip will pop up showing you how often a new laborer is added to your pool, ready for you to use as you see fit.
Later in the life of your city, you will have methods by which you can slightly increase the rate at which you get more laborers. It is perfectly normal that at times you will not have enough for everything that you want to do- you must simply decide how to allocate them when they are in short supply.
Using your Lumbermill and the world map[]
Understanding use of the Lumbermill[]
Your Lumbermill functions uniquely. Unlike your farm, you cannot simply add laborers to the building directly in order to generate wood for your city. Instead, you must venture outside the walls of your city and assign your workers to chop down a forest for you. Forests only contain a finite amount of wood and as such will run out periodically. When this happens, the laborers that you have assigned to work that forest are returned to your labor pool, ready to be assigned to a new forest.


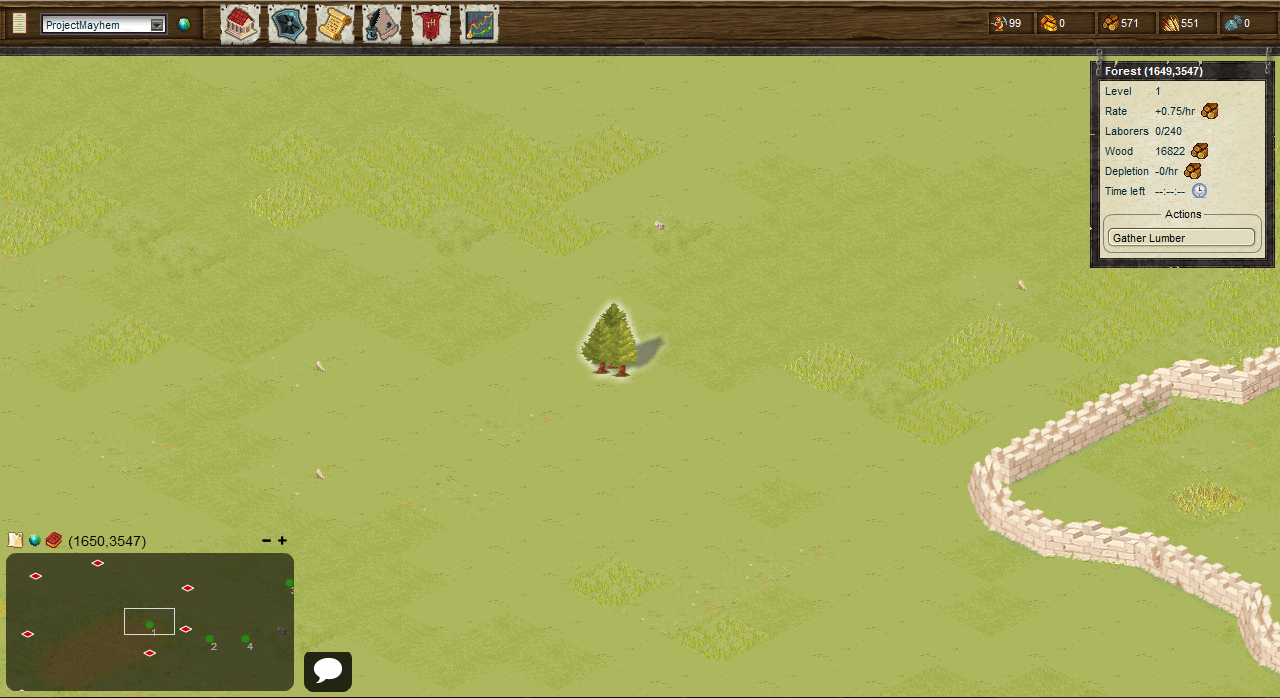
By looking at the tooltip in the menu of your constructed lumbermill on the upgrade button, you can see the highest level forests accessible to you to harvest.
Now, you may have noticed when you first looked at your minimap that there are different levels of forests in this game, these are shown as small numbers to the bottom right of the green dot that marks a forest. The level of the forest that you are able to collect from is determined by the level of your Lumbermill. You can see how the highest level of forests currently accessible to gather from my opening the menu for your Lumbermill and hovering your mouse cursor over the upgrade button for that structure as shown to the right.
At the beginning your Lumbermill will only be level 1 (as are all buildings when first made), a level at which you will only be able to gather from one level 1 forest at a time. As you increase the level of your Lumbermill, you will increase both the number of forests from which you can gather simultaneously as well as the maximum level of forests from which you can gather. Note that you can always gather from lower-level forests if you are so inclined. This means that if your Lumbermill allows you to gather from level 3 forests that you are able to gather wood from any level 1, 2, or 3 forest that is not occupied by the maximum number of players.


The world map gives you a larger view of what is shown on the minimap, giving you a better idea of forests and players around you.
Now that your Lumbermill has been built, it's time to show you how to find a forest so you can begin gathering wood! Bring up the world map by clicking on the leftmost button above the minimap as described above. You will see a screen similar to the one shown to the right. Again, the blue diamond is your city/cities. Green dots are forests, with the number next to them representing the level of each forest.

Hovering your mouse cursor over the icon for a forest on the map will show you both the level of the forest and it's distance from your city.
With the world map open, you are able to see the level of each forest as well as it's distance away from your city by hovering the cursor for your mouse over the icon for each forest. Understand that the distance from your city is important; the farther from your city that a forest stands, the longer it will take for you to begin gathering lumber from there. Because of this, you want generally want to find the closest forests to your city that is the highest level from which you can gather in order to maximize resource income.

Double-clicking on the icon for a forest on the world map will automatically zoom you to that location. This works for cities on the map as well.
Once you have located a suitable forest, you can double-click on it from the world map and you will be zoomed to that forest immediately in the main game screen. That forest will be selected when you zoom to it, as well. You can also select forests to bring up their menu as you would with any building in your city.


The dialog that appears when you want to assign laborers to a forest is similar to that of other labor assignment dialogs, but not exactly the same.
You can begin the process of gathering from the forest that you have found by clicking on the "Gather Lumber" button. This will show a dialog allowing you to assign laborers to the forest. Notice that this dialog is a bit different than when you assigned laborers to your farm; you cannot see here how adding the laborers will affect your lumber income nor does is show how long the assignment will take.
You are unable to see how this will affect your lumber income in this assignment dialog because there are a few factors that affect the rate at which you gather wood (somewhat too advanced to get into at this point)- while this rate is generally close to the same, it can vary slightly. The reason that you are unable to see how long it will take to assign the laborers to that forest is because assignment time to forests is not based on the number of laborers that you are assigning (unlike every other time you will be assigning workers somewhere).
Whether you are only going to assign 1 worker to the forest or as many as you possibly can, it will take the same amount of time. This is not to say that you will get the same lumber income irrespective of the number of laborers you assign- the amount of lumber that you gather from a forest is proportional to how much labor you put there. The amount of time it takes to assign these laborors is based solely on the distance that forest lies from your city. The farther away that a forest is from your city, the longer it will take to assign your laborers to work that forest. You should also remember that if you ever want to change the number of workers that are gathering lumber from a forest, you must totally remove your lumber gathering party (which, remember, automatically and instantly returns those laborers to your idle labor pool) and then reassign the number of laborers that you wish to have gathering lumber to an appropriate forest. Finally, you should know that higher level forests allow for a higher maximum number of laborers in them.
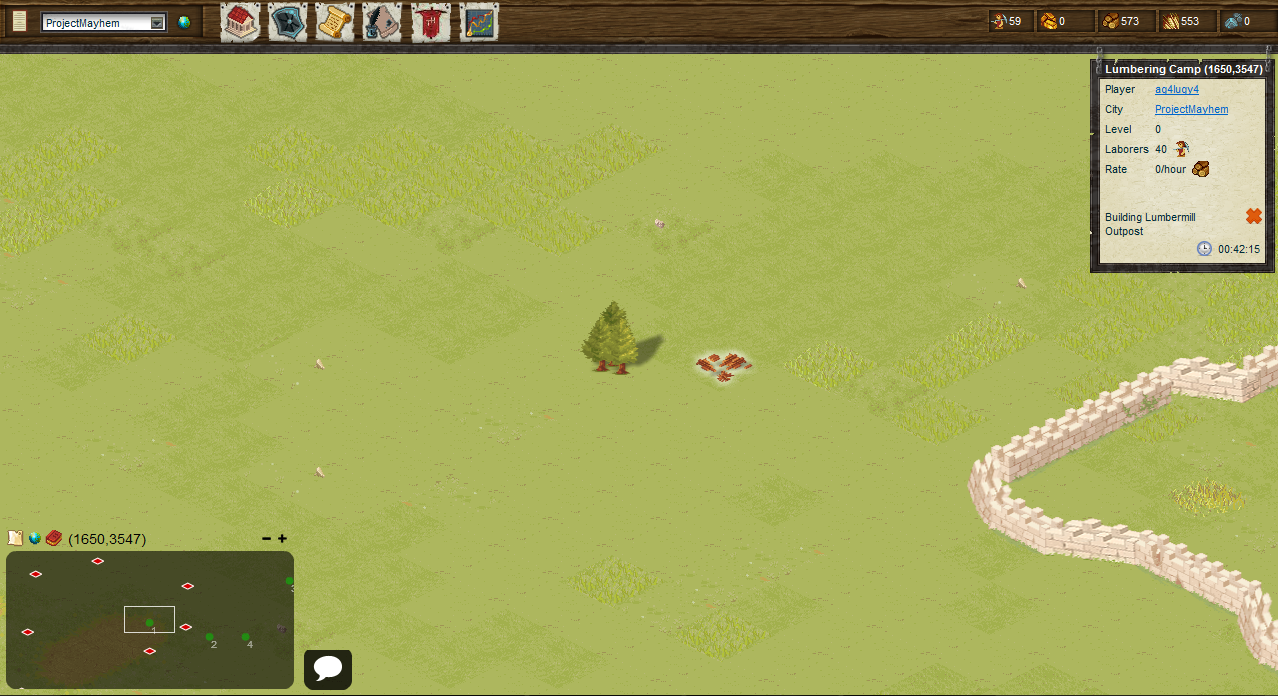

Once you have assigned laborers to a forest, you can see how long it will take to build your lumber gathering camp.
After you have set the number of laborers that you want to have working the forest you have selected, hit the "Ok" button. You will now see a pile of wood next to the forest where you lumber camp is being built. Clicking on that camp will bring up the menu for it, which will show you how long the construction/assignment (these two things are the same in this case) will take.
Upgrading Buildings[]
Back to your Town Center[]
So at this point you have laborers being assigned to your farm and a lumber camp being built by your lumbermill. You can return your screen to view your city by clicking on the globe icon next to your city name from the drop-down menu at the top left as described above.

Once you have built a farm and a lumbermill, you are able to upgrade your Town Center to level 2.
Select your Town Center to bring up the menu for the building. If you have enough resources to pay for the Town Center upgrade, which you very likely should, the upgrade button will no longer be disabled.


You are now able to upgrade your Town Center now that you have built a farm and a lumbermill, assuming that you have enough resources.
By hovering your mouse over the upgrade button, you can see that the red requirements listed earlier that you needed to have those two other buildings constructed have now disappeared. Assuming that you have enough resources to do so, it's time to perform your first building upgrade!
You can see by the description that by upgrading your Town Center, a few things happen. The upgraded Town Center will now increase the maximum amount of crop and wood that you are able to store in the city. It will also produce 50 crop and 50 wood per hour, instead of the 45 per hour it has been producing at level 1. Finally, you will be able to construct a new type of building, the Training Ground.


Clicking on the upgrade button will begin the upgrade process for your Town Center.
Click on the upgrade button for your Town Center to being the upgrade process. After you click on it, you will again be shown a timer that counts down how long the upgrade is going to take in the exact same way as you were shown when you were building other structures. Note that while you are upgrading your Town Center (and later, other buildings), you are not able to use the Town Center to build other things.
Back to your Farm for a moment[]

When labors are finished assigning, you will see a text alert pop up on the top left of the game window like this.
By now, the time for the 10 laborers that you assigned to your Farm earlier should almost be almost completed. When the assignment is done, you will see a text alert pop up on the top left of the game window informing you of this fact.


Remember that you were not able to completely fill your farm with laborers when you first went to assign them there!
Go back to your Farm and click on it to open the building menu. Here you can see that the farm now has 10 out of the maximum of 20 laborers assigned. If you move your mouse cursor over your resource listing to see the tooltop as discusses ealier, you will now see that your hourly income rate for crops has increased now that some laborers have been assigned to the farm.
You can also see that you are able to upgrade your Farm at the moment (again presuming that you have enough resources). It is generally a bad idea to upgrade a Farm when it does not yet have the maximum number of laborers assigned to it. It is almost always a better idea to have the highest resource income that you can before you go for the upgrade.


Completely fill your farm with laborers in the same way that you did previously.
Again assign laborers to your farm in the exact same way that you already have. Be careful that you are in fact assigning laborers to the farm when you move the slider; you can just as easily unassign them, something that you definitely do not want to do at the moment! You will again see a countdown timer for the laborer assignment to complete.
Upgrading your Farm[]


When your farm is full of laborers, its time to upgrade!
Once your Farm has been entirely filled with laborers, it is now time to begin your second upgrade! Especially when your city is first starting out, you want to do everything that you can to maximize resource income, and the best way to do this is by upgrading your Farm and Lumbermill as frequently as possible. You can do this upgrade in exactly the same way that you've already done when you upgraded your Town Center.


With your farm now at level 2, you have room for more laborers to generate more crops for you!
After a short period of time your Farm will finish upgrading. Although the Farm is now a level higher, you will yet not see an increase in crop income.

Your workers will be shown as transferring into the Farm in the same way as you have already seen.
In order to get the crop income increase from your newly upgraded Farm, you must again assign laborers to it. Do this in exactly the same way as you have at your farm already, by clicking on the "Assign Laborers" button. Move the slider all the way to the right again and click on the "Ok" button. You will again see how long the transfer time will take in your Farm menu.
Upgrading your Lumbermill[]
At this point your Farm has finished upgrading and your Town Center is likely still in the process of upgrading. At this point in the game, you can build or upgrade at most 2 structures simultaneously. Later, when your Town Center reaches level 11, this number increases to three. The faster that you are able to build and upgrade buildings, the faster your resource income will grow and you will be able to continue building and upgrading.


Upgrades to your Lumbermill are accomplished by the same methods that you have already used.
That said, you should begin to upgrade your Lumbermill as soon as you can after your Farm has completed upgrading. Open up the menu for your Lumbermill and when you are able, click on the upgrade button. You can also see that once the upgrade to your Lumbermill is complete, you will be able to build a new type of structure, the Basement.
The first time you upgrade your Lumbermill you will not yet be able to gather from higher levels of Forests, but that will come in time with future upgrades. There is not a one-to-one mapping of your Lumbermill level to the level of the Forest from which you can gather, i.e. a level 2 Lumbermill does not mean you can gather from level 2 Forests.


You will see the time that it will take to upgrade the Lumbermill once you click the button to begin the process.
Once you have begun the upgrade to your Lumbermill, you will again be able to see how long the upgrade will take to complete as you've already seen with other structures.
Another Upgrading Requirement[]


If you go to upgrade your Town Center to level 3, you will find yourself unable even if you do have enough resources.
When you are next able to upgrade, you will already have your Farm, Lumbermill, and Town Center all at level 2 (or be working towards it). At this point, open the menu for your Town Center. Even if you have enough resources to do so, you won't be able to upgrade it yet. You'll find that it lists a requirement that you have not yet seen- you must now train 5 fighters in order to be able to upgrade your Town Center.
You have not yet heard of this unit and so far have no capacity to produce them. You will, however, notice that the menu for the Town Center now includes the option to construct a new building, the Training Ground. This is facility in which you will be able to train your first military units, fighters.
Making your Training Ground[]
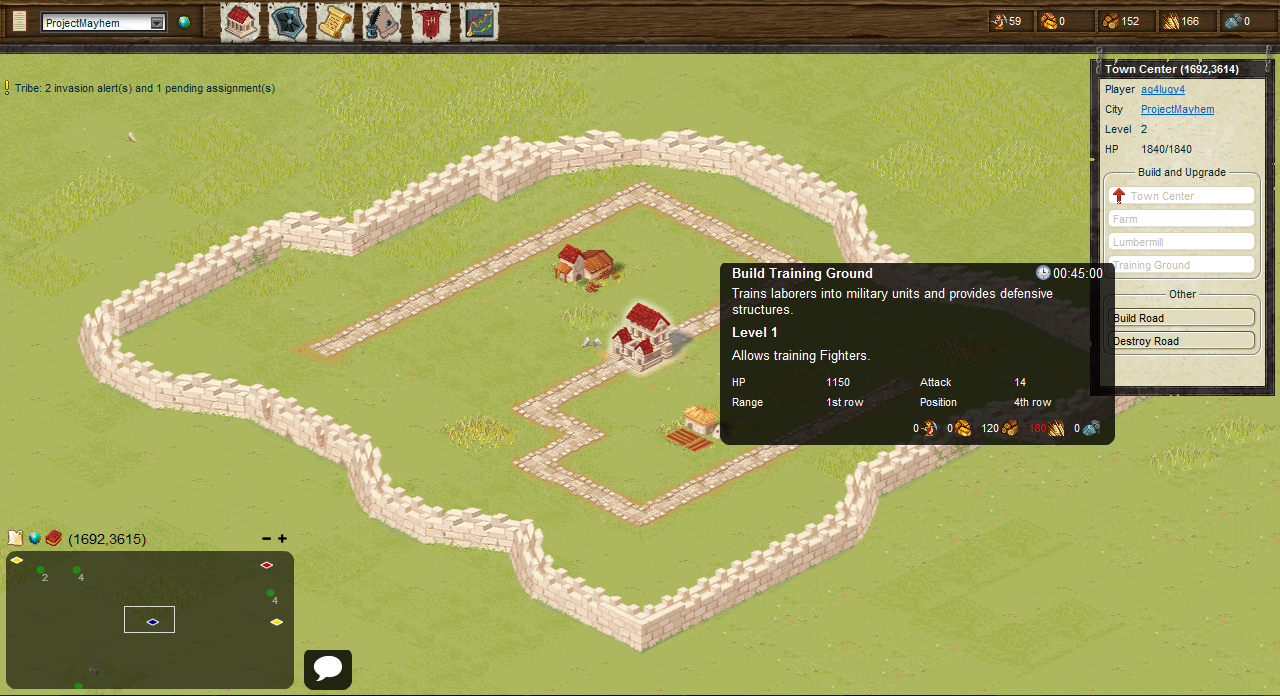
Scrolling over the description for the Training Ground in your Town Center shows you that this structure builds fighters.
If you go to hover your mouse over the button to build a Training Ground, you will again see the description of the building as well as the resource requirements for it's construction. In the illustration to the right, notice that the city does not yet have enough to build it. As always, if that is the case for you, the cure is simply time. Once your have accumulated enough resources, you can begin to build it.


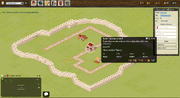
When you go to build your first Training Ground, you will see that you are no longer restricted to the "special" spots.
Upon clicking the button to build the Training Ground, you will see something that you have not encountered before. Recall from earlier that the previous two buildings that you made were restricted to the "special" spots within your city. This is not the case for the Training Ground nor other future buildings (with the exception of the second Farm that you will be able to make later). Clicking on the button to make your Training Ground will highlight all spaces in your city in which you are able to place it.


Double-clicking in any available space will begin the construction of your Training Ground.
Choose and double-click on an available space in order to have your Training Ground begin building. There are a number of considerations for which more advanced players will account when choosing the placement of buildings, but those are far beyond the scope of this document. At this point, simply choose a spot that seems appealing to you and build there.
Making a military[]
Your First Units[]
At this point you have discovered that you are required to train Fighters and have begun and completed the construction of your Training Ground. This is where you will train you first military units. As the game progresses, you will slowly be able to build a large assortment of units to utilize. Now, however, the Fighter is the only option that you will have for units to train.

From the menu of your Training Ground, you can hover over the description of the Fighter in order to view costs and statistics for the unit.
Begin by opening the menu in your newly made Training Ground. You will find in this menu the option to build Fighters. By hovering your mouse over the option for these Fighters, you will see a set a statistics that you have not yet seen.

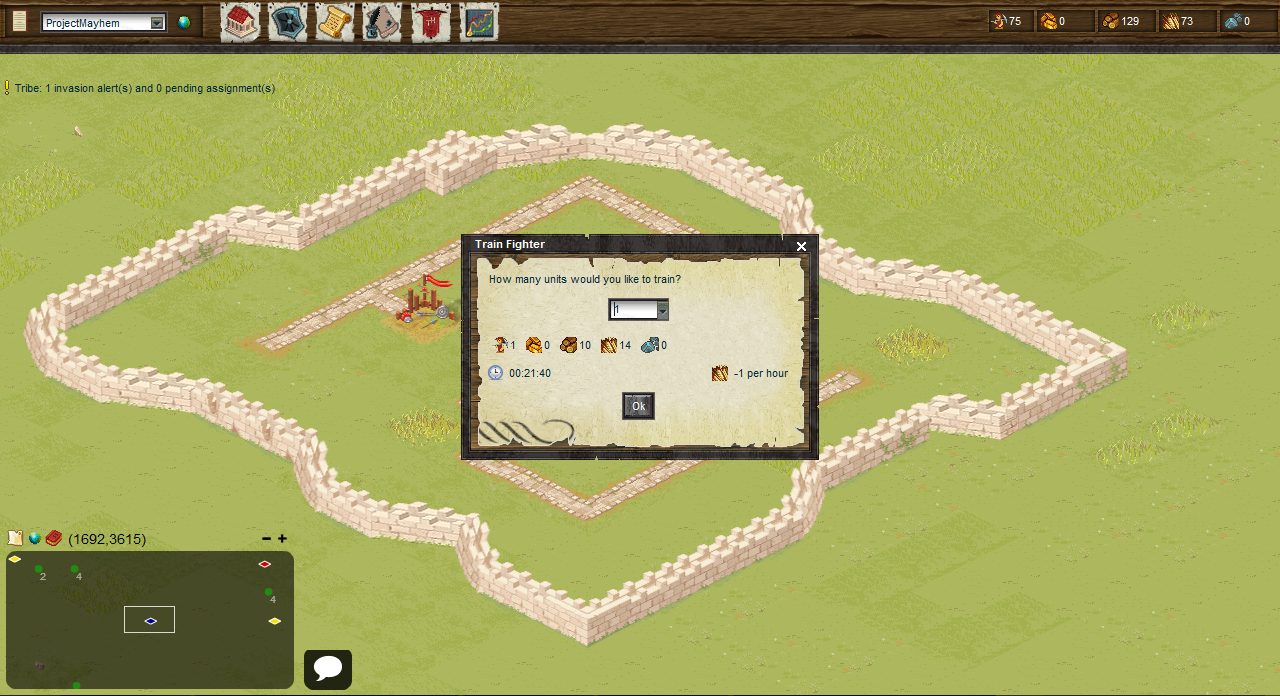
Clicking the button for the Fighter in your Training Ground brings you to a new dialog.
By clicking on the button to train the Fighter, a new menu will pop up. From this menu, you can choose the number of units that you wish to train. Units are always trained consecutively so putting a larger number here does not mean that your Fighters will be trained any more quickly. However, it does mean that you won't have to continually return to this menu in order to train units again if you already know how many you wish to train and have enough resources to pay for it.
By default, the quantity entered into this box is 1 unit (and will always be in the future whenever you go to train units as well).


Notice that by changing the quantity in the shown box, the costs and training time for these units will be automatically updated as well.
Since you know that you need to train 5 Fighters in order to further upgrade your Town Center, change the value in the box to a 5. Notice that this automatically updates the total cost of all of the units to be trained, as well as giving you the time it takes to complete the training of all 5 units.
When you opt to train multiple units at the same time, a new one starts training as soon as the previous one has been completed. Additionally, units are available as soon as any individual has completed training. This means that even though you have specified 5 Fighters to be trained via this dialog, you will be able to unitilze the first one as soon as it has completed it's training (though using only one fighter for anything likely will not do you any good- more on that later).

As you have already seen when building structures and lumber camps, you will again see a countdown until completion of unit training.
Once you click on the "Ok" button when you have selected the number of troops that you wish to train, you will again see a countdown timer in the menu of your Training Ground that shows both how many units you have left to train as well as how long it will take to train all of those units.